Overview
Prerequisites
- Create a free netlify account.
- Create a free bitbucket or github account (recommend bitbucket due to being more commonly used in enterprises)
- Create a folder for your HTML files and store on desktop of your computer to make this process easier.
- Download GitBash at git-scm.com and follow default installation steps, no need to change much (free)
- Create a bitbucket or github repo under "Create a Repository" (for bitbucket you will create a workplace beforehand once account is created. A workspace is just a name for all Atlassian services you have access to dont worry this is free.)
- Name your github or bitbucket branch "test" (Use this for this project to help follow along my guide and not be confused with branch naming convention)
- Link your VS Code editor to you bitbucket or github account(super easy since you are already logged in on your browser VS Code prompts and just click "Grant Access")
- Lets get to Building!
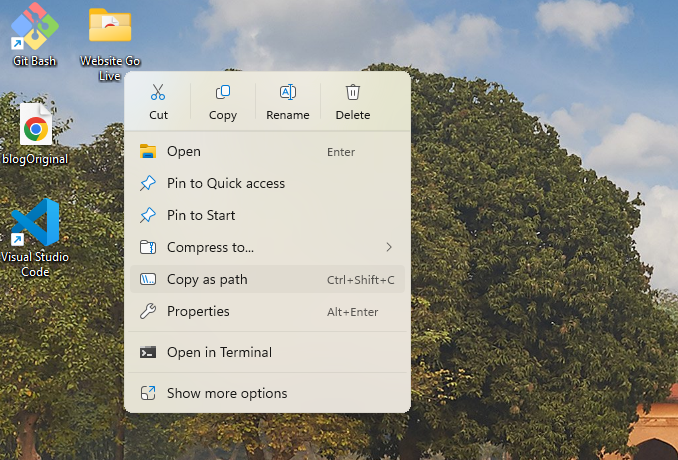
Grab your folder path of HTML files folder.

In the terminal initialize your very first git repo command. Type gitinit and then hit Enter

Type git add . (This adds files from your folder containing your HTML files to your repo)

Now this is where things get a bit tricky feel free to email me any questions.
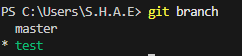
My branch name is "test" for running a test deployment environment. GitBash automatically puts you in master branch. We need to switch to test branch so run this exact command.

To make sure you are on test branch Run git branch command in terminal and you should see *test highlighted in green
Now time to Commit your code to the repository
- First Run "git commit -m "New" " (What this does is commits your code to your bitbucket/github repo and then you can link your repo to your Netlify account to deploy.

Now remote add your origin this step I completed from Bitbucket but github is similar process.
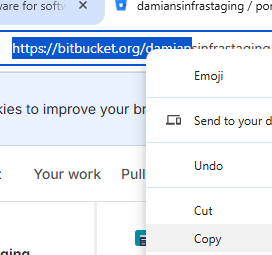
Grab your bitbucket URL from your web browser address bar
Next go back to your VS Code terminal and run this command pasting your exact URL address after "remote add origin" (This process links your repo to your git terminal for future code changes)

Time to pull and push your code creating your very first CI/CD pipeline to your Bitbucket/Github repo
Run a pull command to pull repo with this line of code (Note: "test" is the name of your branch in the future you can name your branch whatever you want with git switch -c newname)

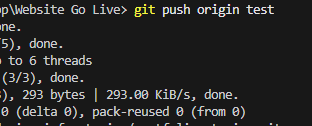
Run a push command to push your repo code with this line of code (Note: test is the name of your branch)
CONGRATULATIONS! YOU HAVE SETUP YOUR VERY FIRST CI/CD PIPELINE YOU CAN NOW LINK THIS WHEREVER YOU WANT WHETHER IT IS NETLIFY/VERCEL OR EVEN SELF HOST ON YOUR OWN WEB SERVER. Please feel free to email me if you are stuck on a step. Thank you!